

How to add Rainbow Sparkling Effect on Image Tutorial,In this tutorial you will be learning how to add a rainbow sparkling effect on Spider man Image In Adobe Photoshop Rainbow Sparking Tutorial.
Final Spider Image.

Before Image.

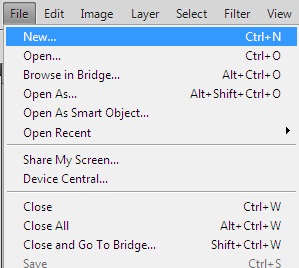
Step 1 : File Open document.
New Document by 1000*800.
 Step 2 : Fill It Black Alt+Backspace.

Unlock Layer Just Double Click.

Step 3 :Go to layer Penal FX Button Gradient Overlay.

Color Setting.


After Background.

Step 4: Open Spider Man Image.

After simple Press Ctrl+T And Adjust .

Step 5 : Duplicate Spider Man Image Layer Ctrl+J .

Step 6 :Go To Filter Blur "Motion Blur".


After Blend Mode Change Color Dodge Layer Down of Image Layer.

Final Spider Image.

Before Image.

Step 1 : File Open document.
New Document by 1000*800.


Unlock Layer Just Double Click.

Step 3 :Go to layer Penal FX Button Gradient Overlay.

Color Setting.

Gradient Overlay Setting.

After Background.

Step 4: Open Spider Man Image.
Select Move Tool And Simple Move On Original Document.


Step 5 : Duplicate Spider Man Image Layer Ctrl+J .

Step 6 :Go To Filter Blur "Motion Blur".

Motion Blur Setting.

After Motion Blur Image Down Of layer Penal And Go To Fx Button Gradient Overlay.

Gradient Overlay Select Rainbow Effect.

After Gradient Setting.

After Image Look Like This.

Step 7 : Add A Outer Glow Effect Select Layer 1Spiderman And FX Button "Outer Glow".

Outer Glow Setting.

After Image.

Step 8 : Create new layer .

Select Brush Tool And Brush Size.

Go To Window "Brush".
Brush Setting Shape Dynamic .

After Scattering And Tick Mark Soothing , Protect texture.

Apply On Image.

After Blend Mode Change Color Dodge Layer Down of Image Layer.

And Here we Are Final Image.


1 comments:
Thanks a lot man,
really nice,
going to bookmark this so that will be photoshop expert,,
dynamic select box
Post a Comment